  // iOS        // Find element in table cell         driver.findElementByXPath("//XCUIElementTypeCell/XCUIElementTypeStaticText[@name='some-id']"));


        //   Print source of screen visible        System.out.println(driver.getPageSource());

        //default timeout for all commands executed using this driver. can be overridden using explicit wait        driver.manage().timeouts().implicitlyWait(3, TimeUnit.SECONDS);

        //EXPLICIT wait for element for x seconds        //  If explicit wait > implicit wait , then greater driver will default to greater wait period        int seconds= 3;
        WebDriverWait wait = new WebDriverWait(driver, seconds);
        wait.until(ExpectedConditions.visibilityOfElementLocated(By.id("some-id")));

//        UIAutomation(IOS)//        Find visibility of element using XPath        xpath = "UIATableCell/UIAStaticText[@label='Family'][@visible='true']";
        driver.findElementByXPath(xpath);

        click on first table cell (xpath may change based on your application)
        xpath("//UIAApplication[1]/UIAWindow[1]/UIATableView[1]/UIATableCell[1]").click
Showing posts with label terminal. Show all posts
Showing posts with label terminal. Show all posts
Thursday, 22 September 2016
Helper methods Appium 1.6.0 Beta
Saturday, 18 May 2013
Get rid of facetime, misson control from mac on every start in 3 steps
Step 1) cd /Library/Preferences
Step 2) sudo vi com.apple.dockfixup.plist
Step 3) Locate unwanted startup items and remove them , save the file and exit it and restart ur machine
Happy 'mac'ing
<dict>
<key>after</key>
<string>begin</string>
<key>path</key>
<string>/Applications/Mission Control.app</string>
<key>tile-data</key>
<dict>
<key>file-type</key>
<integer>169</integer>
</dict>
</dict>
<dict>
<key>after</key>
<string>/Applications/Mission Control.app</string>
<key>path</key>
<string>/Applications/App Store.app</string>
</dict>
<dict>
<key>after</key>
<string>end</string>
<key>group</key>
<integer>80</integer>
<key>path</key>
<string>/Applications/Server.app</string>
<key>server</key>
<true/>
</dict>
<dict>
<key>after</key>
<string>/Applications/iChat.app</string>
<key>path</key>
<string>/Applications/FaceTime.app</string>
</dict>
How to make personal website in 5$ / 5£ / 500 Rupees & 10 minutes!!
I started making a website for one of my relative and had to refresh my memory on how to get it up and running.
Here is how simple way to do it
2) web hosting server
3) Some html page.
2) For web host server, I chose www.50webs.com/ which is my favorite free web hosting server for almost 5 years now.
Other options are using wordpress or blogger or some paid servers like hostgator
3) HTML code
open note pad , copy below code and save it as "index.html"
<!DOCTYPE html>
<html>
<body>
<h1>My First Heading</h1>
<p>My first paragraph.</p>
</body>
</html>
Hope you website must be up & running soonHere is how simple way to do it
Ingredients needed :
1) Domain name2) web hosting server
3) Some html page.
How to get them
1) I registered my domain at http://www.bigrock.in/, You can get a domain name at other popular sites like godaddy.com / net4.in2) For web host server, I chose www.50webs.com/ which is my favorite free web hosting server for almost 5 years now.
Other options are using wordpress or blogger or some paid servers like hostgator
3) HTML code
open note pad , copy below code and save it as "index.html"
<!DOCTYPE html>
<html>
<body>
<h1>My First Heading</h1>
<p>My first paragraph.</p>
</body>
</html>
Steps to do at Bigrock website
- Login to ur domain provider (say you have purchased domain name hello.com)
- click on your domain and choose website manager or similar options
- update nameserver to point to your webhost in this case its dns1.50webs.com and dns2.50webs.com check pic4
- Once you have set nameservers wait for an hour or so and check domain provider website again Check picture fig5 below, It indicates some warnings ignore them (these warnings are an indication that nameservers are recognized)
- Mean proceed to next section where we upload files to web host
 |
| Pic4: Set name servers |
 |
| Fig5: Ignore these errors |
Steps for uploading files to webhost (50webs.com in this case)
- Create login and log into 50webs.com
- Go to domain manager -> my domains -> hosted domain -> host domain
- Create a domain name exactly same as your website name (purchased with bigrock ex: hello.com). Having same name will help 50webs resolve DNS to your website for all incoming traffic that comes to your domain purchased at bigrock.
- Copy the index.html file we saved previously in to file manager for the newly created domain in step3
- Wait for 1-2 hours for DNS and NS to recognize ur website
- In my case it took1 hour but it might take upto 24 hours for DNS to be working properly
Drop a link to ur site when you have created using my blog
It makes me feel proud :)
Thursday, 9 May 2013
Reading Excel file using ruby
This is an example to read excel file in ruby (this can be used for reading excel workbook as well) using RubyXL gem
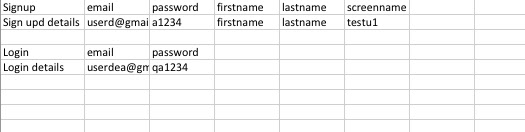
Step 1) Create an excel workbook like below
Step 2) Create a ruby file including gems
require 'rubygems'
require 'rubyXL'
Copy path to excel file and replace it in place of work book
workbook = RubyXL::Parser.parse("/Users/username/Downloads/simple_spreadsheet.xlsm")
This first sheet of excel workbook can be read into hash table using below command
hash_arr=workbook[0].get_table(["Login", "email", "password"])
Multiple tables can be present in same file and they will read based on the format given in the above command (this helps in organizing many data tables in single sheet of excel file)

Step 3: If needed it can be used in cucumber file as below

Source code :
require 'rubygems'
require 'rubyXL'
workbook = RubyXL::Parser.parse("simple_spreadsheet.xlsm")
hash_arr=workbook[0].get_table(["Login", "email", "password"])
all_tables=hash_arr[:table]
puts all_tables
For more details refer to - https://github.com/gilt/rubyXL project
Output looks like below

Monday, 6 May 2013
Setting folder name to show in mac terminal prompt
To set terminal prompt to show name of current folder use the below command
echo 'export PS1="\W \$: "' >> ~/.bash_profile
PS1 can be configured to show the terminal prompt to show below options
- \d – Current date
- \t – Current time
- \h – Host name
- \# – Command number
- \u – User name
- \W – Current working directory (ie: Desktop/)
- \w – Current working directory, full path (ie: /Users/Admin/Desktop)
Subscribe to:
Posts (Atom)