  // iOS        // Find element in table cell         driver.findElementByXPath("//XCUIElementTypeCell/XCUIElementTypeStaticText[@name='some-id']"));


        //   Print source of screen visible        System.out.println(driver.getPageSource());

        //default timeout for all commands executed using this driver. can be overridden using explicit wait        driver.manage().timeouts().implicitlyWait(3, TimeUnit.SECONDS);

        //EXPLICIT wait for element for x seconds        //  If explicit wait > implicit wait , then greater driver will default to greater wait period        int seconds= 3;
        WebDriverWait wait = new WebDriverWait(driver, seconds);
        wait.until(ExpectedConditions.visibilityOfElementLocated(By.id("some-id")));

//        UIAutomation(IOS)//        Find visibility of element using XPath        xpath = "UIATableCell/UIAStaticText[@label='Family'][@visible='true']";
        driver.findElementByXPath(xpath);

        click on first table cell (xpath may change based on your application)
        xpath("//UIAApplication[1]/UIAWindow[1]/UIATableView[1]/UIATableCell[1]").click
Showing posts with label Automation. Show all posts
Showing posts with label Automation. Show all posts
Thursday, 22 September 2016
Helper methods Appium 1.6.0 Beta
2) Migration IOS Appium tests from UIAutomation to XCUITest
Most of the Elements have changed after Instruments have moved form UIAutomation to XCUITest
Hence all references using classnames and xpaths in Appium Automation must be updated to run from Appium 1.6.0 onwards
at the moment its in beta
Look at installation procedure here - http://mytechlifez.blogspot.co.uk/2016/09/appium-1.6.0-beta1-installation-xcode8-ios10.html
UIATableview -> XCUIElementTypeTable
UItableviewcell -> XCUIElementTypeCell
Choose row 1 in a table using xpath-
Hence all references using classnames and xpaths in Appium Automation must be updated to run from Appium 1.6.0 onwards
at the moment its in beta
Look at installation procedure here - http://mytechlifez.blogspot.co.uk/2016/09/appium-1.6.0-beta1-installation-xcode8-ios10.html
Table elements
Table / RowUIATableview -> XCUIElementTypeTable
UItableviewcell -> XCUIElementTypeCell
Choose row 1 in a table using xpath-
"///XCUIElementTypeTable[1]/XCUIElementTypeCell[1]/XCUIElementTypeStaticText[1]"
"//XCUIElementTypeCell[1]/XCUIElementTypeStaticText[1]"
XCUItest iOShttps://discuss.appium.io/t/appium-xcuitest-example-how-to-get-started-appium-using-xcuitest-for-real-device/12415/4//Migrating from UIAutomation to XCUItestUIAButton changes into  XCUIElementTypeButton
UIA***    --> XCUIElementType***
UIAStaticText -> XCUIElementTypeStaticText
UIATableView -> XCUIElementTypeTable
UIANavigationBar -> XCUIElementTypeNavigationBar
Buttons
"UIABUtton" is replaced by "XCUIElementTypeButton"
1) Appium 1.6.0 beta1 Installation
I have managed to run my IOS tests on XCUItest using below changes.
Elements have to migrated from UIA to XCUI elements
Inorder to run appium on 1.6.0 beta 1 for ios 10 and xcode 8
use below settings
[caps]
platformName = "iOS"
orientation = "PORTRAIT"
platformVersion = "10.0"
deviceName ="iPhone Simulator"
noReset = "false"
automationName = "xcuitest"
appiumVersion = "1.6.0-beta1"
app="<app_path>/<app_name>.app"
[appium_lib]
Installation
npm uninstall appium
npm install appium@1.6.0-beta1
npm install -g appium-xcuitest-driver
Install carthage dependency manager
Error : Fetching dependencies\nPlease make sure that you have Carthage installed (https://github.com/Carthage/Carthage)\nNote: We are expecting that carthage installed in /usr/local/bin/\n',
Solution : brew install carthage


Elements have to migrated from UIA to XCUI elements
Inorder to run appium on 1.6.0 beta 1 for ios 10 and xcode 8
use below settings
[caps]
platformName = "iOS"
orientation = "PORTRAIT"
platformVersion = "10.0"
deviceName ="iPhone Simulator"
noReset = "false"
automationName = "xcuitest"
appiumVersion = "1.6.0-beta1"
app="<app_path>/<app_name>.app"
[appium_lib]
Installation
npm uninstall appium
npm install appium@1.6.0-beta1
npm install -g appium-xcuitest-driver
brew install carthage
Install carthage dependency manager
Error : Fetching dependencies\nPlease make sure that you have Carthage installed (https://github.com/Carthage/Carthage)\nNote: We are expecting that carthage installed in /usr/local/bin/\n',
Solution : brew install carthage

Xcode 8 Installation :
download xcode
unzip the xcode file
Rename old /Applications/Xcode.app to /Applications/Xcode7.app(incase you still want to keep it)
Drag new Xcode app to /Applications/Xcode.app
Open Xcode and install it


Other fixes:
If you encounter issues check here - https://github.com/appium/appium/issues/6853
I had to manually run bootstrap as mentioned in above link
cd ~/.npm-global/lib/node_modules/appium-xcuitest-driver/WebDriverAgent
sh Scripts/bootstrap.sh
To Properly install node check this link - https://github.com/sindresorhus/guides/blob/master/npm-global-without-sudo.md
Monday, 5 August 2013
Reading plist file using ruby : useful for calabash IOS Automation
#!/usr/bin/ruby -w
# encoding: utf-8
require 'plist'
def read_plist(plist_file)
result=Plist::parse_xml(plist_file)
i=0
result.each { |k, v|
i=i+1
puts k
puts v
puts
}
end
read_plist("features/dump/test.plist")
# encoding: utf-8
require 'plist'
def read_plist(plist_file)
result=Plist::parse_xml(plist_file)
i=0
result.each { |k, v|
i=i+1
puts k
puts v
puts
}
end
read_plist("features/dump/test.plist")
Sample plist file
<?xml version="1.0" encoding="UTF-8"?>
<!DOCTYPE plist PUBLIC "-//Apple//DTD PLIST 1.0//EN" "http://www.apple.com/DTDs/PropertyList-1.0.dtd">
<plist version="1.0">
<dict>
<key>Language</key>
<string>Svenska</string>
<key>Version</key>
<integer>4</integer>
</dict>
</plist>
very useful while readings strings for localisation (calabash)
Thursday, 9 May 2013
Reading Excel file using ruby
This is an example to read excel file in ruby (this can be used for reading excel workbook as well) using RubyXL gem
Step 1) Create an excel workbook like below
Step 2) Create a ruby file including gems
require 'rubygems'
require 'rubyXL'
Copy path to excel file and replace it in place of work book
workbook = RubyXL::Parser.parse("/Users/username/Downloads/simple_spreadsheet.xlsm")
This first sheet of excel workbook can be read into hash table using below command
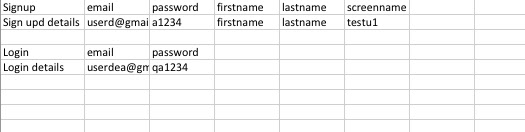
hash_arr=workbook[0].get_table(["Login", "email", "password"])
Multiple tables can be present in same file and they will read based on the format given in the above command (this helps in organizing many data tables in single sheet of excel file)

Step 3: If needed it can be used in cucumber file as below

Source code :
require 'rubygems'
require 'rubyXL'
workbook = RubyXL::Parser.parse("simple_spreadsheet.xlsm")
hash_arr=workbook[0].get_table(["Login", "email", "password"])
all_tables=hash_arr[:table]
puts all_tables
For more details refer to - https://github.com/gilt/rubyXL project
Output looks like below

calabash-ios: reusing step definitions using macros
This post is intended to explain how to reuse step definitions in calabash
Given I want to test macro
Then I have macro "hello"
Examples:
| filename |
| hello |
Call the second step definition here
Given(/^I want to test macro$/) do
var="test string"
macro 'I have macro "'+var+'"'
end
This step can be used as macro in other step definitions
Then(/^I have macro "(.*?)"$/) do |arg1|
puts arg1
end
Lets see with an example with a feature file
Scenario Outline: I am able to test macroGiven I want to test macro
Then I have macro "hello"
Examples:
| filename |
| hello |
Step definitions file
Call the second step definition here
Given(/^I want to test macro$/) do
var="test string"
macro 'I have macro "'+var+'"'
end
This step can be used as macro in other step definitions
Then(/^I have macro "(.*?)"$/) do |arg1|
puts arg1
end
Calabash-IOS: Tips to search elements in View and webview
Calabash supports identification of view both using xpath & CSS
Its confirmed in in here https://groups.google.com/forum/#!msg/calabash-ios/nubfmY-6jbM/aSoYtW9mT8cJ
But this information is missing in wiki page
Usage :
Using CSS to identify elements : query("webView css:'#header'")
for xpath identification replace css by xpath and specify the path.
In Calabash-IOS there is no way to get source of HTML page, Getting elements from page
can be bit tricky, There are several possibilities to get past this
check my video on this www.youtube.com/watch?v=w5rxvI3w2Ss
And also check below video
1) Use query("webView css:'*'") to get all associated elements on page then search for text you are looking at.
Index of results returned from query can be used to identify elements
Example:
res=query("webView css:'*'")
res[12] - could be the element you may want to verify
2) To verify if object is shown on screen .empty? can be very handy
res=query("view text:'SomeText'").empty? # res is false if element is present
use begin rescue block (in Ruby) to catch these exceptions and handle them
3) use regular expression
4) Using variables in search
5) Looping up and down until text found
end
or
7) to check first & last result of array
Its confirmed in in here https://groups.google.com/forum/#!msg/calabash-ios/nubfmY-6jbM/aSoYtW9mT8cJ
But this information is missing in wiki page
Usage :
Using CSS to identify elements : query("webView css:'#header'")
for xpath identification replace css by xpath and specify the path.
In Calabash-IOS there is no way to get source of HTML page, Getting elements from page
can be bit tricky, There are several possibilities to get past this
check my video on this www.youtube.com/watch?v=w5rxvI3w2Ss
And also check below video
1) Use query("webView css:'*'") to get all associated elements on page then search for text you are looking at.
Index of results returned from query can be used to identify elements
Example:
res=query("webView css:'*'")
res[12] - could be the element you may want to verify
2) To verify if object is shown on screen .empty? can be very handy
res=query("view text:'SomeText'").empty? # res is false if element is present
use begin rescue block (in Ruby) to catch these exceptions and handle them
3) use regular expression
query("view {text LIKE '*hello*'} ")
4) Using variables in search
text_to_check="hello"
query("view {text LIKE '*#{text_to_check}*'} ") 5) Looping up and down until text found
while(true)
begin
#check text found and click
rescue
#if there was any exception reported
scroll("view",:down)
end end
or
wait_poll(:until_exists => "label text:'Cell 22'", :timeout => 20) do
  scroll("tableView", :down)
end
6)For converting case use upcase function
"hello".upcase
7) to check first & last result of array
arr=query("view {text LIKE '*#{text_to_check}*'} ")
arr.first
arr.last
Monday, 6 May 2013
Calabash-IOS helping tester to setup project - Not a guide for devs
This is a like a quick guide to help tester setup certificate and IOS project for calabash-ios
1) Create apple developer account
https://developer.apple.com/ then add your account to your company list for that you may need invitation from one of other team members who are already in that group
2) Go to https://developer.apple.com/devcenter/ios/index.action and log in with user name & pwd

1) Create apple developer account
https://developer.apple.com/ then add your account to your company list for that you may need invitation from one of other team members who are already in that group
2) Go to https://developer.apple.com/devcenter/ios/index.action and log in with user name & pwd
- Go to Certificates, Identifiers & Profiles
- under Certificates, download certificate for ur name
- Double click on and add it login key chain
- Connect device
- Go to xcode -> window > organizer
- select device -> click on add portal
Now you device must be all set to be used for current project
Error & Solution:
to use dev certificate that was present on old machine on new machine export p12 certificate from previous machine and then use it here
This link will help in doing that - http://www.utexas.edu/its/help/user-certs/812
Calabash-ios backdoor - A Magic way to set precondition in calabash - Be careful & choosy while using it
Lets looks at the Use of it
I had a test app for which i had to write tests but after each login, to logout I had to navigate 4-5 pages, This added extra overhead to my testing
Suppose i have 3 tests and second test fails without logging out I would never have starting point for my 3rd test and hence that would fail
I wanted a single start point from where I start my test each time. Thats when I decided to use calabash backdoor function.
Lets looks at changes first
1) Added below function delaration in app AppDelegate.m
This code will change for your application but the way of using it is similar.
In my case dev team member helped me with logout functionality
#pragma mark -
#pragma mark - Calabash Method
- (NSString *) calabashBackdoor:(NSString *)aIgnorable
{
[[ONEApplication sharedInstance] logOut];
AppDelegate* delegate = (AppDelegate*)[[UIApplication sharedApplication] delegate];
[delegate showLoggedOutViewController];
return aIgnorable;
}
2) Add declaration in AppDelegate.h
This can be kept as below or method name can be changed but method signature has to be maintained.
//Calabash Method
- (NSString *) calabashBackdoor:(NSString *)aIgnorable;
3) Now compile the Application
Time of verify changes are reflected or not
4) Deploy application , Launch calabash-ios console
run 'calabashBackdoor' command and this must be executed on the application
Simple steps to get ruby 1.9.3 for calabash on mac osx 10.7
I did face this problem of getting ruby 1.9.3 on mac osx 10.7
Then I realized I need rvm but before doing all this I did need xcode installed
this must be easy for mac experts not for me definitely
Here are simple steps for a mac beginner to get ruby 1.9.3

Then I realized I need rvm but before doing all this I did need xcode installed
this must be easy for mac experts not for me definitely
Here are simple steps for a mac beginner to get ruby 1.9.3
- Download install xcode from appstore
- Install command line tools from xcode - Go to xcode->preferences->downloads->components->commandline tools
- Install RVM
\curl -#L https://get.rvm.io | bash -s stable --autolibs=3 --ruby - Install ruby using RVM - Install ruby 1.9.3 and use it
rvm install 1.9.3
rvm use 1.9.3
Errors & Solution
If there are error in RVM installation do this
Type following commands
~ $: source ~/.rvm/scripts/rvm
~ $: type rvm | head -n 1
rvm is a function
~ $: vi ~/.bash_profile add this line into bash_profile
If there are error in RVM installation do this
Type following commands
~ $: source ~/.rvm/scripts/rvm
~ $: type rvm | head -n 1
rvm is a function
~ $: vi ~/.bash_profile add this line into bash_profile
"source ~/.rvm/scripts/rvm"
Install ruby 1.9.3 and use it
Install ruby 1.9.3 and use it
Sunday, 10 March 2013
Robotium testing webview example (test application and application) source download
Robotium test source code - https://github.com/tejasv02/Robotium4Webviewtest
Webview sample test application -
https://github.com/tejasv02/Androidwebviewsampleapp
Robotium 4.0 has been released with webview support which enables testing of hybrid applications .
Some new functionalities have been added which enables testing of webpage embedded within native app also called as hybrid android application.
new functionalities inculde:
waitForWebElement(By by), clickOnWebElement(WebElement webElement), enterTextInWebElement(By by, String text), typeTextInWebElement(By by, String text), clearTextInWebElement(By by), getWebElement(By by, int index)
webview component is present in this file : https://github.com/tejasv02/Androidwebviewsampleapp/blob/master/src/com/myapp/WebViewActivity.java
customHtml string is used to create a temporary html, which is used to fill
webview and then this html is loaded into webview
String customHtml = "<html><body><h1>Hello, WebView</h1></body></html>";webView.loadData(customHtml, "text/html", "UTF-8"); // if this line is commented ,// uncomment it for test purpose
Tests are located in - https://github.com/tejasv02/Robotium4Webviewtest/blob/master/Robotium4webviewtest/src/com/testcalc/Testcase1.java
package com.testcalc;


import java.io.IOException;

import java.util.ArrayList;


import com.jayway.android.robotium.solo.By;


import android.view.View;


public class Testcase1 extends Apptest{


public Testcase1() throws ClassNotFoundException {

super();

}


public void testDisplayBlackBox() throws IOException {


Commonval.log(this.getName().toString());


solo.clickOnText("Go to");

  solo.waitForWebElement(By.textContent("Hello, WebView"), 10, false);

solo.sleep(5000);

}

}
This is not an exhaustive explanation for a starter but should suffice some one who knows a bit of robotium,
Please feel free to leave comments below
Steps
Part1: running webview application
Steps
1) Go to github copy project link - https://github.com/tejasv02/Androidwebviewsampleapp.git
2) Import project into eclipse
3) Solve dependency errors
4) Run web view application test as Android application
Part2: Testing webview application
Steps:
1) Go to github and copy project link - https://github.com/tejasv02/Robotium4Webviewtest.git
2) Import project into eclipse
3) Solve dependency errors
4) Run web view application test as Android application
Dependency
Git plugin to download project from github - http://download.eclipse.org/egit/updates
Problems : The import android cannot be resolved
Install plugin for android - https://dl-ssl.google.com/android/eclipse/
set path for Android SDK - Windows -> preferences -> Android
Video
Subscribe to:
Posts (Atom)